Extending from my previous post [Note] Light Transport Path Integral, We already knew PDF for each sampled path is the joint PDF of path
vertices, and the PDF for each path vertex is based on its BRDF.
However, there is no PDF for connection edges or for the
final segment of the path that is just connected directly to the light or
camera based on visibility. With Monte Carlo, if we just do the integration with the PDF from one of the path sampling algorithms, the estimator might have extremely high variance because each PDF can't cover all conditions, it only covers part of the domain.

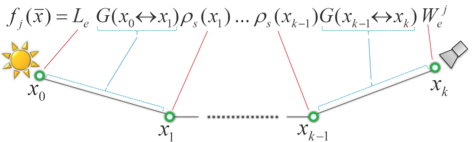
Screenshot from 2013 Siggraph course by Jaroslav Krivanek
No matter what kind of path sampling techniques used (Path Tracing or Light Tracing...), non of them can properly sample each term of the measurement contribution function. Either it doesn't sample camera sensibility, light emission, or there is no way to accurately sample the connection of two sub-paths.
Bidrectional Path Tracing basically combines different sampling techniques , connects sub-paths, and utilizes "Multiple Importance Sampling (MIS)" to deal with the missing PDF for the connection. Like we just said, every sampling algorithm only covers part of the domain, there might be paths that should contribute a lot to the final image but it only gets subtle attention.
Bidrectional Path Tracing basically combines different sampling techniques , connects sub-paths, and utilizes "Multiple Importance Sampling (MIS)" to deal with the missing PDF for the connection. Like we just said, every sampling algorithm only covers part of the domain, there might be paths that should contribute a lot to the final image but it only gets subtle attention.

Screenshot from 2013 Siggraph course by Jaroslav Krivanek
As you can see, if we only consider Pa(x), for sampled path Xa, its contribution function actually is quite high but the probability of it is super low. With BPT which uses MIS on multiple sampling techniques, we can have a more accurate PDF for the contribution function, which in turns give us a better render image.